
Microsoft gave us big possibilities in mixing Caliburn.Micro and MVVM.
MVVM was created to be adapted to WPF instead of MVC, which is used mostly on ASP.Net applications. Caliburn.Micro is a framework designed for WPF and other platforms.
First, let’s break down MVVM.
If we split MVVM, “M” stands for model. That represents all the pieces of data in our application. In other words, the model will be used to interact inside the application and represent the database. “V” stands for view. View is the user interface or the FrontEnd of the application. This view will be the user-readable part, where they will interact with data. And at the end, we have “VM,” which stands for view model. This last piece is where all the logic, management, and creation of data will show in the views and is where we will work with CRUDs.
So now we can apply the theory to an example project. We will use Visual Studio 2017 as our IDE.
I have opened Visual Studio and created a Blank Solution named MVVM_Example.
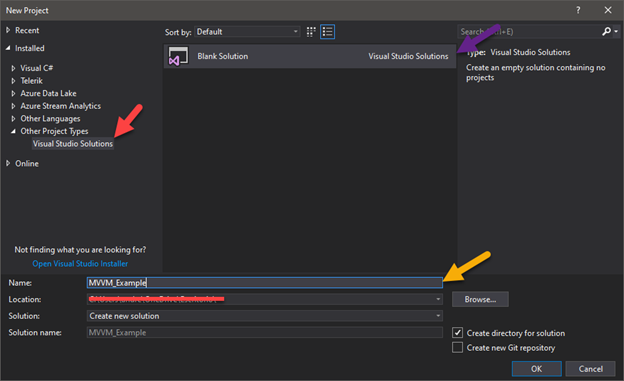
Now with our blank solution created, we need to create the project. To do that, hover over the solution right-click -> add -> New Project. On the next window, select “WPF App (.NET Framework)” as the project type.

Now that we have our solution and project created, it is time to implement the Caliburn.Micro on the application. So, for this part, we will have to inject a NuGet Package into the project. Right-click on the project name and select “Manage NuGet Packages”. Now on the opened window, select the “Browse” tab on the top left, and on the search bar, type “Caliburn.Micro”.
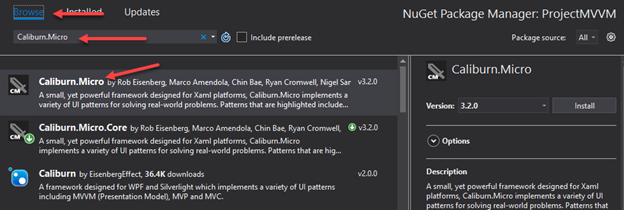
When located, click on the install button on the right. A message will prompt you to click Ok. After a few seconds, a message will appear below saying that the NuGet has been successfully Installed.
The next step is going to apply Caliburn.Micro into the project. To do that, use bootstrapper to Initialize. Why bootstrapper? Because bootstrapper is the complement of Caliburn.Micro to start our application using this framework.
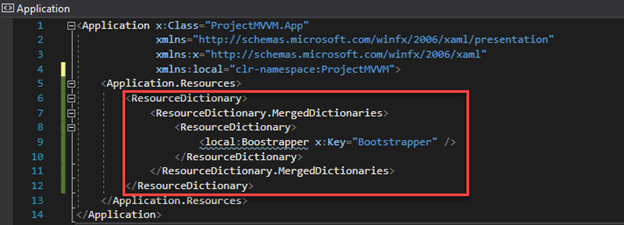
Now, we will have to delete the MainWindow.xaml that .Net created for this project. After deleted, go into de App.xaml, where the application starts. Set this to use Bootstrapper as the Initializer. As you can see, our <Application.Resources> is empty. So, let’s fill it with this code below:
<ResourceDictionary>
<ResourceDictionary.MergedDictionaries>
<ResourceDictionary>
<local:Bootstrapper x:Key=”Bootstrapper” />
</ResourceDictionary>
</ResourceDictionary.MergedDictionaries>
</ResourceDictionary>
Once we insert this into <Application.Resources>, we have to delete the top part where it says StartupUri=”MainWindow.xaml”, because, with the code that we added, we are telling the app that there is a new route to start with bootstrapper.
Now maybe your wondering, where is the bootstrapper implemented? To solve that problem, right-click on the project -> add -> class and name this bootstrapper.
Now that we have bootstrapper, we are going to make some changes. First, let’s change the class to be public. We are going to inherit this class from BootstrapperBase. Next, we have to add the using statement to this class that it will be:
using Caliburn.Micro;
Next, add a constructor with this inside:
Initialize();
Then add as a method the following code:
protected override void OnStartup(object sender, StartupEventArgs e)
{
DisplayRootViewFor<ShellViewModel>();
}
With this code, we tell the application that it will start using bootstrapper by calling the ShellViewModel. The ShellViewModel will be the class that will handle all our windows on the application. That is how MVVM works with Caliburn.Micro.
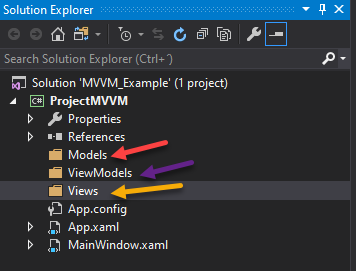
So, next, create three different folders. One named Models, ViewModels, and Views.
Right-click on the project, add “New Folder” and then name each of the folders.
Then create the ShellViewModel. It will go inside the ViewModels Folder. So, right-click on ViewModels Folder -> add -> Class, and name that ShellViewModel.cs.
Once that class is created, we have to inherit that class from Screen. Screen is a Caliburn.Micro property that gives us more control of our view. Add this using Caliburn.Micro.
Now that we have the ShellViewModel, let’s add the corresponding view. Right-click on Views -> add -> Window and named it ShellView.xaml
Go to bootstrapper, and add this code on the top:
using ProjectMVVM.ViewModels;
What we are doing is implementing bootstrapper the ViewModels of the application to find the ShellViewModel.
At this point, we can run the application and see how our ShellView prompts on the screen. I bet you are asking, why in the world is this showing this view if we don’t have any code on the ShellViewModel. This is because there is something called Name Convention on Caliburn.Micro Documentation that says if we named classes properly, everything will work together.
In this case, the backend is our ShellViewModel and the frontend is the ViewModel. That is how they are connected and working together.
Now we will create a C# class inside the Models folder. For this example, we will create EmployeeModel.cs as our Model to work with.
Inside the class created, we will create the attributes for the Employee that we want to manage in this application. So, create a basic model in an EmployeeModel class.
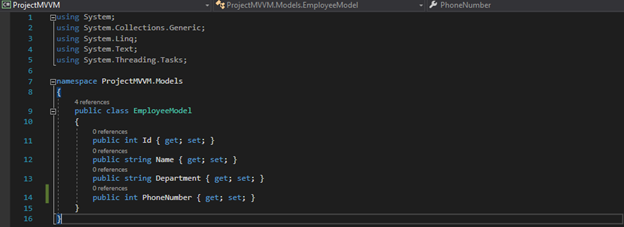
We got our Model ready to be managed on the next layer, the ViewModel.
Now let’s go to the next level. In the ViweModels folder, we are going to create a C# class called EmployeeViewModel. As you can see, we are using the same name format to reference the correct flow of every different model on the application.
Once we have the class ready to work, we have to tell this class that it will be working with or Model.
As a standard practice, we usually create a ViewModel connected to the view and the corresponding model. We use the ShellView as the Main window in our app and the ViewModel to call every window dedicated to every different object or purpose on the application. But for this example, we are going to work just on the ShellViewModel and the corresponding View, working with the EmployeeModel.
By now, we are going to use the ShellViewModel to get and set data into EmployeeModel. So, we will create a constructor on the ShellViewModel where we will add some employees to show them on the view.
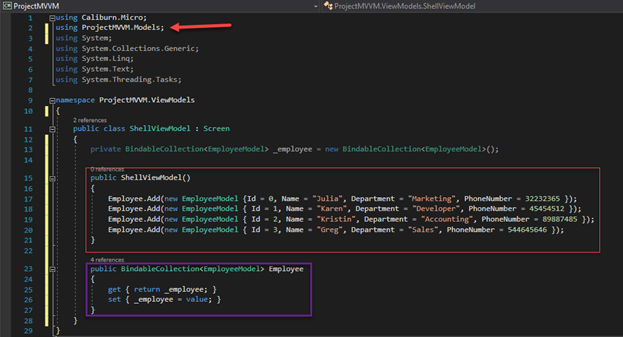
Now we can add a reference to the models in order for us to use the constructor and create and bind data to the EmployeeModel.
The next step is to show this data in the view. To make that possible, we are going to put all the data into a ComboBox. But, before leaving ShellViewModel, let’s create a property where it will handle the selected.
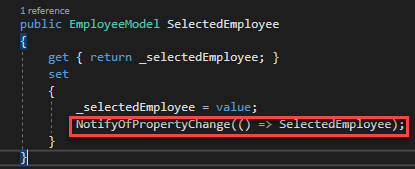
You can see the new property that it will handle the selected Employee. But if you are a good observer, you can see that we add a property call NotifyPropertyChange(). This property is one of the most powerful pros that Caliburn.Micro gave us. This property is notifying the public attribute each change we made to the private one. Use the method in the Caliburn.Micro class in order to capture the event when a property is changed.
Now, we can go to the view and show all the initialize data loaded on the constructor.
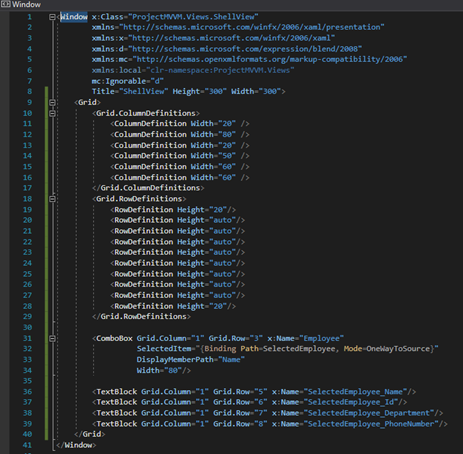
In this view, we can see how we create definitions for rows and columns. This is made to control every space on the window and assign it to a property. In this case, we added one BomboBox that will Bind to all the Data inside Employee (attribute created on ShellViewModel). The SelectedItem will be the last attribute that we created, and the DisplayMemberPath will be the value that we want to display.
Then, below we have the TextBlocks, where we are going to show the selected data from the one Employee that we selected on the ComboBox. This is where the NotifyPropertyChange will work, so every time we choose a different employee, this TextBlocks will be updated with the correct data.
Now, if you run the application, it should look like this:

We can now see how using the Calibur.Micro library will allow us a simpler solution with large results to our UI.
This is just one of the many cool projects we’re working on here at Advisicon. If you’re looking for custom development or have questions you can get in touch here. We’d love to connect.
