
Need to figure out a better way to handle PDFs?
As the digital era transforms how we handle documents, harnessing the power of PDFs within the Microsoft 365 suite is a game-changer. Whether collaborating, presenting, or streamlining your workflow, our top five tips are your key to navigating PDFs with unparalleled ease.
Ready to elevate your Microsoft 365 experience? Let’s dive into a realm of seamless PDF handling.
1. Link your accounts
Adobe and Microsoft have partnered to deliver unmatched modern work experiences to customers worldwide. Linking your accounts removes data silos and makes your PDF processes seamless between the platforms.
Adobe Acrobat for M365
You’ll begin by performing a basic installation of Adobe Acrobat for M365.
- Navigate to Appsource.Microsoft.com in your web browser.
- Search the site for Adobe Acrobat.
- Click “Get it now” to install Adobe Acrobat for Microsoft 365. You may be prompted to enter or confirm your M365 login credentials. It will give you options to install the add-ins as an administrator for other users or install them for yourself. If you’re doing it for yourself, you may need to request an administrator’s approval. The process is straightforward.

Link Microsoft Accounts in Acrobat
Next, we’ll add account file access. This lets you access SharePoint, OneDrive, or Outlook (Acrobat mobile app) PDFs.
Adobe Desktop App
- Navigate to the home screen.
- Select “Add file storage” at the bottom of the left-hand column.
- You’ll see both OneDrive and SharePoint as options to add.
- Log into your Microsoft account.
- It may prompt you to request access from your system admin.
Acrobat Mobile App
- Select “files” at the bottom.
- Add OneDrive or your Microsoft 365 email account.
Web Browser
- Go to Acrobat.Adobe.com to easily add your OneDrive account.

2. Understand key conversion settings
PDF files are a great way to share final files! They’re mostly meant for viewing, not for editing. That means that when you’re going to convert your working Microsoft files into PDFs, the work is complete and ready to be locked down.
If you’ve linked your accounts successfully and installed the Acrobat for M365 app, an Acrobat tab will appear in the top navigation bar of your desktop application.
By clicking on the tab, your pdf options will open. Similar options will be displayed for all of the standard Microsoft applications. Select Preferences or Change Conversion Settings to go into PDF settings.
The compatibility should automatically be set to the most up-to-date version of Acrobat. “Standard” is fine for saving documents. However, you can select “high-quality print” if that’s the final output or “smallest file size” if it’s a massive file containing many images. There are also special-purpose standards, PDF/X (printing), PDF/A (archiving), PDF/E (engineering), and more.
You can choose to include attachments or not, create bookmarks or embed index (automatically from your file settings? Yes, please!), and add links.
In certain programs, choose if you’d like to output a PDF portfolio or a standard PDF file. For example, in Outlook, if you have a standard email thread you’re converting to a PDF, a simple PDF will do. If you’re converting a folder with numerous emails that could become a complex paper trail, choose to create a portfolio. The portfolio’s file structure is preserved in the PDF for easy navigation.
I always recommend enabling accessibility for the greatest possible audience to access the content. Acrobat builds in text recognition and alternative text for images to make the work more usable by people with disabilities.
Settings is also where you can work with page layout options, allowing you to change the paper size and orientation. Page settings are very important with applications like Excel and PowerPoint, which typically have content that doesn’t conform to our standard paper sizes. Think about the file’s purpose and select what makes the most sense.
Moving into the security tab, we can choose to require a password to open the document and restrict editing and printing of the document. Consider, “Is this sensitive information?” and “Who’s going to access this file?”

3. Learn to love Teams
Microsoft Teams offers a ton of options to work with PDFs. If you’re looking to get your coworker’s input on a PDF, this is a great program to collaborate with them easily.

In Teams, install the Adobe Acrobat app. It’s easily available by clicking the plus sign at the bottom of the sidebar and performing a search. Once installed, Adobe Acrobat will show up in your sidebar and prompt you to sign in. Depending on your settings, you may need to put in a request to your IT team to get it enabled.
PDFs can be uploaded directly into channel files. You can also share a PDF as a tab. To push out a document to a channel, you can start a new post, click the plus sign at the bottom of the post, and select Adobe Acrobat. From there, select a file from within Teams, OneDrive, or upload it from your computer.
Once posted to the channel, everyone should have access to view and add comments while in Teams (provided they too have the Acrobat app installed). By going into the Adobe Acrobat application within Teams, we can select our pdf, Tools at the top, and most of the same tools that are available in the desktop Acrobat application will pop up here. We can edit text, reorder pages, and much more. To add feedback, select the comment icon in the top right. Just like in Microsoft apps, you’re able to @ mention your colleagues as needed in your comment. You can This ensures that everyone can add their thoughts and necessary changes can be made.
4. When to use a PDF
You may ask, why don’t people just send their working Microsoft program files? Why even bother with Acrobat? Familiarizing yourself with when to send a PDF is rather basic, but extremely beneficial.
When you’re uncertain of your collaborator’s/viewer’s technology
The joy of a PDF is its accessibility. Not everyone has the same software, hardware, or operating systems and it’s hard to know if/when working files will display correctly. PDFs were created by Adobe to give people “an easy, reliable way to present and exchange documents.” They allow you to capture content from any app and distribute it in a solid state to a wide array of electronic devices.
When you have an overly zealous or multiple collaborators
When you have work that’s practically finished and just needs a few tweaks before distributing, a PDF is the way to go. We’ve all encountered a time when you’ve sent out a working file and the result came back looking nothing like the document you sent out. PDFs encourage thoughtful changes and commenting over directly editing.
When you need a secure document
Password protection comes into play in a PDF to prevent unauthorized copying and editing. You can even redact information to delete sensitive data permanently. Your working files will never have the amount of security that a PDF has.
5. Send for e-signatures in Edge
While many use Safari or Chrome as an internet browser, Adobe has special integrations that make Edge a smooth way to work with PDFs and securely send them for signatures.
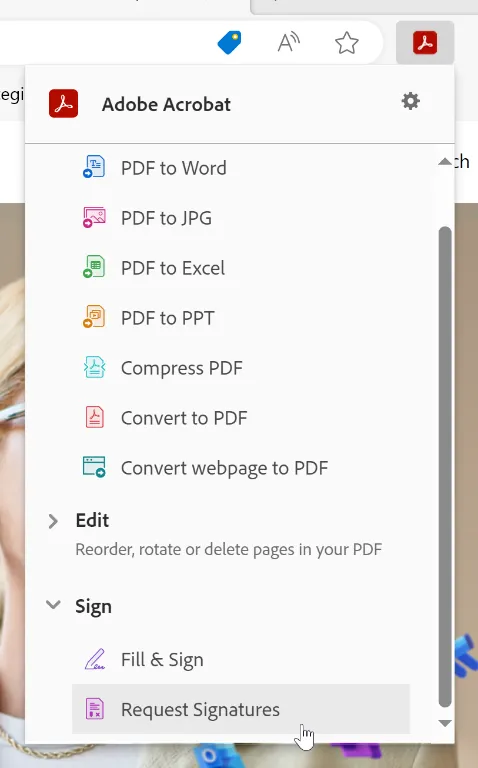
First, you’ll want to enable the Acrobat extension by clicking the puzzle piece and searching for Adobe Acrobat. Once installed, pin it to the navigation bar for easy access.
In the pinned app, scroll to Sign and select Request Signatures.
A webpage will automatically launch. Click the Select files button or drag and drop a file into the drop zone.
Select the document you want to send for e-signing. After Acrobat uploads the file, it will prompt you to add recipients’ email addresses (you can also opt for recipients to sign in a certain order).

After selecting Prepare document, you can mark where signers need to fill in and sign as well as a variety of fields like initials, date of signing, checkboxes, etc. You can add unique form fields for each signer.
After clicking Review and Send, you will compose your email invite. Change the agreement name as needed and add a message that suits your purposes. Selecting the three dots next to a recipient’s information will allow you to add password verification to each, further securing the document. Select More options below the message to set email reminder frequency and add recipients of the final copy of the completed agreement.
Click Send to email your document for e-signing. Click Track this agreement to see the PDF and a sidebar with actions and updates.
The most important items to note here are the Status, Reminders, Download Audit Report, and Activity.
The status lets you know if the PDF is out for signature, in progress, canceled, or has been signed. For extra peace of mind, you can download an audit report that contains the activity milestones along with Transaction IDs generated on the Adobe Sign server. Selecting Reminders lets you add an email reminder as well as view and delete existing reminders.
Your success shortcut
So, there you have it! Mastering the art of PDFs in Microsoft 365 can totally revolutionize how you work, boosting your productivity and simplifying document juggling.
With the fab five tips we’ve shared, you’re all set to tackle PDF challenges like a pro in the Microsoft 365 world. Whether you’re teaming up with colleagues, rocking presentations, or just keeping things neat and tidy, these tricks empower you to get the most from your digital docs.
Dive into these tips, let Microsoft 365 jazz up your PDF game, and watch your work become a breeze—more efficient, collaborative, and downright successful.
Got questions? Reach out or explore the Adobe Acrobat learning site for extra wisdom. Cheers to a future of smooth sailing in the ever-changing Microsoft 365 scene!
